Built-in Setup
Do you need a URP / HDRP version of the APK?
Just send an email to: speedtutoruk@gmail.com via my website with your invoice number and I'll happily send it your way. If not check the URP / HDRP setup guides to do it all yourself!
Importing Notes & Troubleshooting
Layers & Tags Reference Guide
Make sure to create tags called:
InteractiveObject
ExaminePoint: Tag for the ExaminePoint gameobject parented to the ExamineCamera
InspectPoint: Tag for every single inspect point that exists for an object
Create Layers:
User Layer 8: ExamineLayer (Doesn't need to be added to objects, referenced in code)
User Layer 9: InspectPointLayer (Tag for every single inspect point)
User Layer 10: PostProcess
User Layer 11: PadlockSpinner
LAYER NOTE: If you can place these on the corresponding User Layers (As below) it is easier for setup, as Unity will automatically place them in the correct places so the below information might not be all relevant to you. (It's worth checking through just in case)
IF NOT added to these layers check the sections below on Checking Prefabs (See side bar) - Just to confirm all appropriate layers are added and no issues arise.
TextMeshPro Required
Please note that TMP will appear as a popup if not installed in your project
Click Import TMP Essentials to use the system fully
DontDestroyOnLoad yellow warning
This just means that objects that use DontDestroyOnLoad shouldn't be children of a parent. Just make sure they exist in your hierarchy without a parent, when you choose to finalise your product. I just kept them in little organised areas for the sake of visuals.
Other Issues? Contact Me
📧Contact Me(Please Read) Important Import Suggestions
Download and import the Adventure Puzzle Kit from the package manager.
Window > Package Manager > Search for "Adventure Puzzle Kit"
Importing Tips:
Import into a fresh project rather than a working project (To avoid issues or conflicts)
Always keep a backup of your working project BEFORE importing ANY assets
In the Import Unity Package dialog box that appears when you first click to import the asset (It will show all the folder structure in a last)
Choose the first Next button which will lead to the Project Settings
UNTICK the project settings folder (None of the items will be ticked at this point)
Select the Import button to start the new import
Step 1 - Errors & FIxes On Import (Built-in Pipeline)
You will get import errors that refer to Post Processing (Import PP package to fix)
Go to the Package Manager (Window > Package Manager)
Filter by Unity Registry
Search "Post Process". You will see Post Processing appear in the list (Make sure to install this package)
Step 2 - APK Startup Window
The APK startup window should appear, you may need to expand the window to see all the button links (If they aren't visible).
You can dock this window if you wish and has FAQ information, contact buttons and helpful information.
Open APK help window for easy links and advice: APK > Tools > Adventure Kit Support Hub
Step 3 - Open Demo Scene
We'll open the demo scene so we can get the basics setup to be used, follow steps below
Navigate to Assets > Adventure Puzzle Kit > Scenes > FirstPerson_AdventureKit_Demo
Double click to open this scene to start using it
Step 4 - Creating Tags & Layers
Select any GameObject in the Hierarchy and then create tags and layers in the top right of the inspector (Some or all tags may already be created)
Make sure to create tags called:
InteractiveObject
ExaminePoint: Tag for the ExaminePoint gameobject parented to the ExamineCamera
InspectPoint: Tag for every single inspect point that exists for an object
Create Layers:
User Layer 8: ExamineLayer (Doesn't need to be added to objects, referenced in code)
User Layer 9: InspectPointLayer (Tag for every single inspect point)
User Layer 10: PostProcess
User Layer 11: PadlockSpinner
LAYER NOTE: If you can place these on the corresponding User Layers (As above) it is easier for setup, as Unity will automatically place them in the correct places so the below information might not be relevant to you.
If you can't use the user layers above, follow the setup bellow and the "Checking prefabs" section will have the information you need to check all your assets use the correct layers!
Step 5 - Setting Up Main Camera
Select the Main Camera (APK_FPSContainer > FPSController > MainCamera)
Physics Raycaster script - Make sure the Event Mask has the layer of PadlockSpinner
Leave Max Ray Intersections at 0
Post-Process Layer: Set the Layer to: Post Process
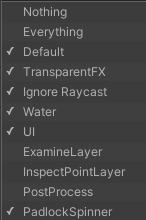
Select the Culling Mask dropdown (On the MainCamera) and make sure:
ExamineLayer, InspectPointLayer and PostProcess are UNTICKED (Everything else can be ticked)

Step 6 - Setting Up Examine Camera
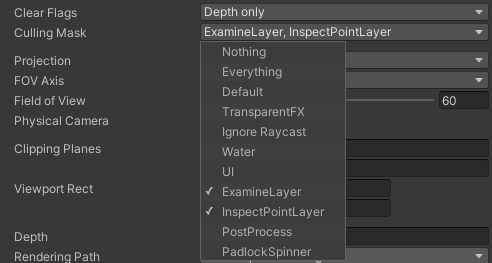
Select the Examine Camera (Child of the Main Camera):
Select the Culling Mask and make sure ExamineLayer and InspectPointLayer are TICKED ONLY
Clear Flags Set To: Depth Only

Step 7 - Post Processing Volume Layer
Select the PostProcessingVolume GameObject
Set the layer to PostProcess (Top Right of the Inspector)

If you do have any runtime errors with post processing, you may need to remove the "Post-Process Layer" from the main camera and re-add it.
Step 8 - Checking Prefabs
We just need to check we have the correct layers on the padlock spinners or they won't be detected properly
Go into the Prefabs > Spawnable > Padlock folder
Open the brass and black padlocks seperately (By double clicking the prefabs)
Select all of the combination spinners and make sure the all have the layer of PadlockSpinner (In the top right of the inspector when you select the spinners)
Step 9 - Check Examination Objects
We just need to check examine objects have the correct layers on their inspect points (So they render correctly)
Inside the Puzzle Objects GameObject folder in the Hierarchy
Open the Examine - Objects
Find any object which has Inspect Points (The knife will have some by default)
Make sure these inspect points have a layer of InspectPointLayer (Or they will not render correctly)
You can check any other object which has inspect points but should be setup by default!

Step 10 - Enable Legacy Input System
We'll need to enable the legacy system if you're using Unity 6+ and it isn't enabled by default
NOTE: New input system support is coming in v1.8
Go to Edit > Project Settings > Player > Other Settings
Scroll down half way and you'll see Active Input Handling
Set this dropdown to BOTH and press Apply (The editor will restart)
Others Issues? Contact Me!
📧Contact MeLast updated